

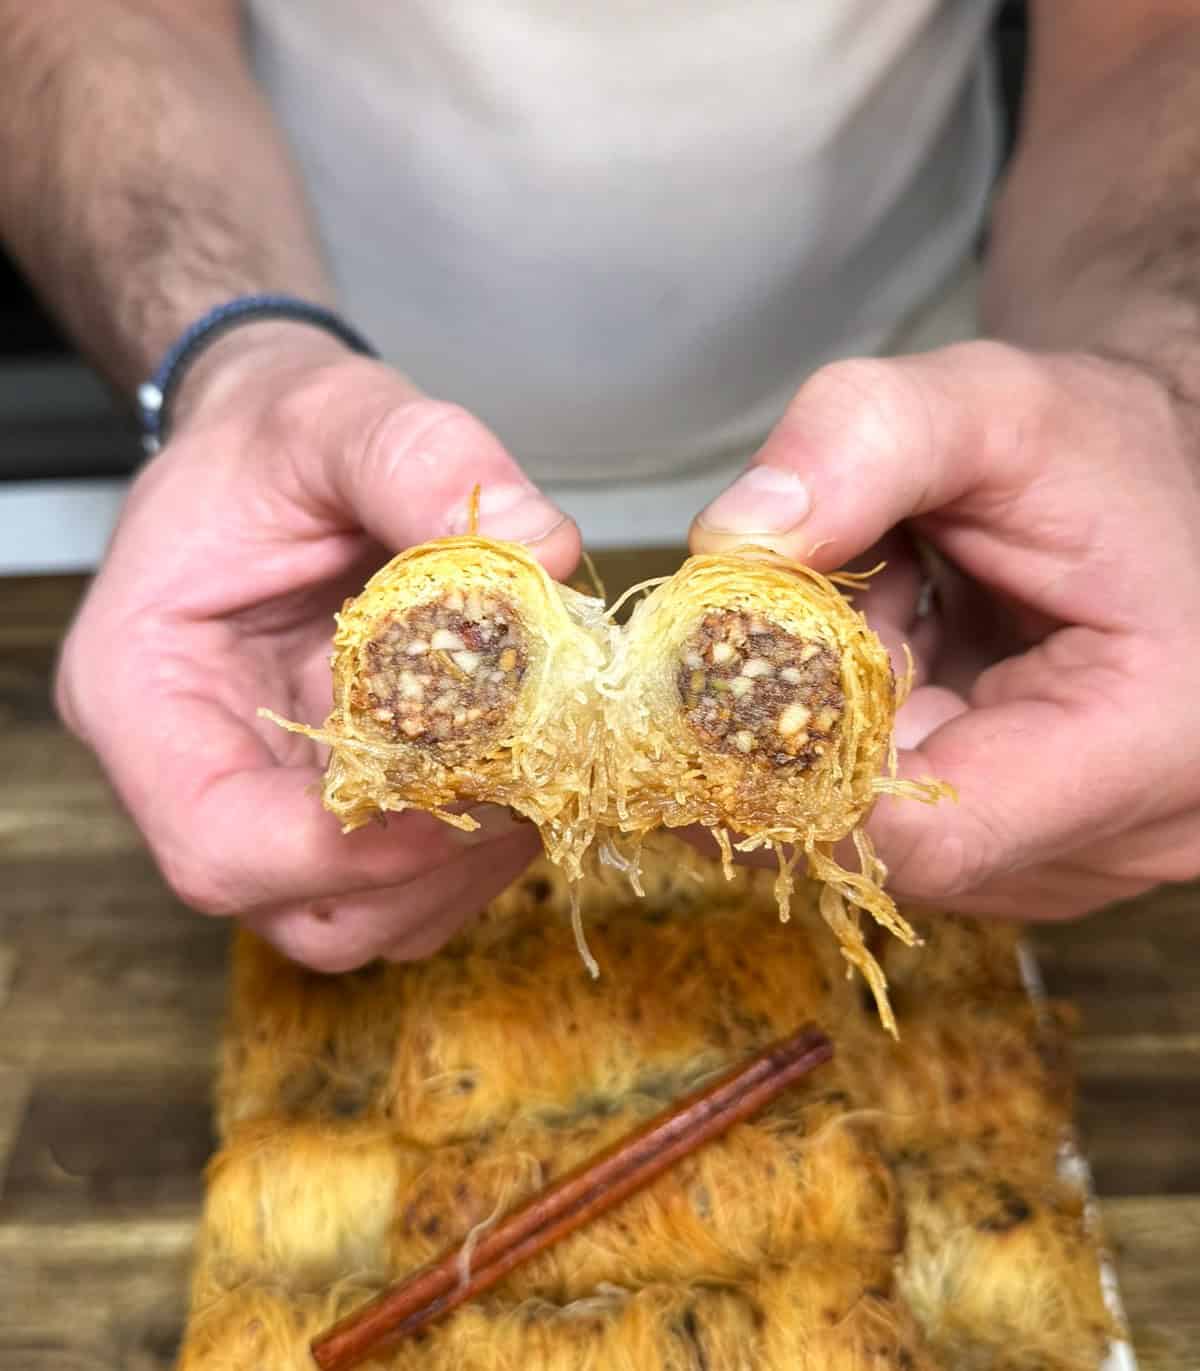
This easy Greek kataifi rolls recipe makes the crispiest, flakiest dessert you'll ever try! These baklava-style golden pastries are filled with spiced nuts and soaked in sticky-sweet syrup. They’re buttery, crunchy, and melt in your mouth. Trust me, they taste even better than they look!

If you love the crunchy texture and syrupy, nut-filled flavour of these kataifi rolls, then you’ve got to try my baklava rolls recipe. They’re just as satisfying, but made with traditional phyllo pastry and rolled a little differently.
Or, if you’re craving something rich and creamy, check out my ekmek kataifi recipe. It starts with a crispy kataifi base and gets topped with thick custard and airy whipped cream.
Jump to:
Why you will love this recipe
- Crispy, Golden Perfection: These kataifi rolls come out golden and crunchy, with a nutty filling that’s full of flavour. The pastry stays light and flaky, and they hold their shape beautifully.
- Classic Greek Flavour: If you’re into traditional Greek desserts, this one’s a proper favourite. The mix of warm spices, toasted nuts, and sweet honey syrup gives you that rich, familiar taste we all grew up with.
- Quick and Easy to Make: Once you’ve rolled a few, you’ll get the hang of it. Working with thin strands of kataifi might look fiddly, but it’s actually simple and pretty satisfying once you get started.
- Great to Share and Make Ahead: These rolls are easy to portion, and they taste even better the next day. You can prep them ahead of time and bring them along to any meal or celebration.
Overview of the key steps
Here’s a quick look at the steps to make 18 delicious, bite-size cigar-style desserts. Some people even call them baklava kataifi because the flavours are so similar.
- Boil the syrup: Boil sugar, water, honey, lemon juice, and spices. Set aside to cool completely.
- Prepare the nut filling: Combine crushed pistachio nuts, almonds, and walnuts with spices, a bit of sugar, and a splash of syrup to hold it together.
- Loosen the kataifi pastry: Gently loosen and separate the kataifi dough, then divide and cut into equal portions.
- Assemble the rolls: Spoon the nut mixture onto each strip and roll tightly into neat kataifi rolls.
- Bake and add syrup: Bake the rolls until they’re golden brown, then pour the cooled syrup over the hot rolls to finish them off.
Watch the video tutorial
Follow along with my step-by-step video and see how this kataifi pastry recipe comes together from start to finish.

If you enjoy this recipe, don’t forget to like, comment, and share it with someone who would love this delicious dessert aswell.
Ingredients
Let’s take a closer look at what makes this recipe so special. As always, scroll down to the recipe card for the full list of quantities.
Syrup
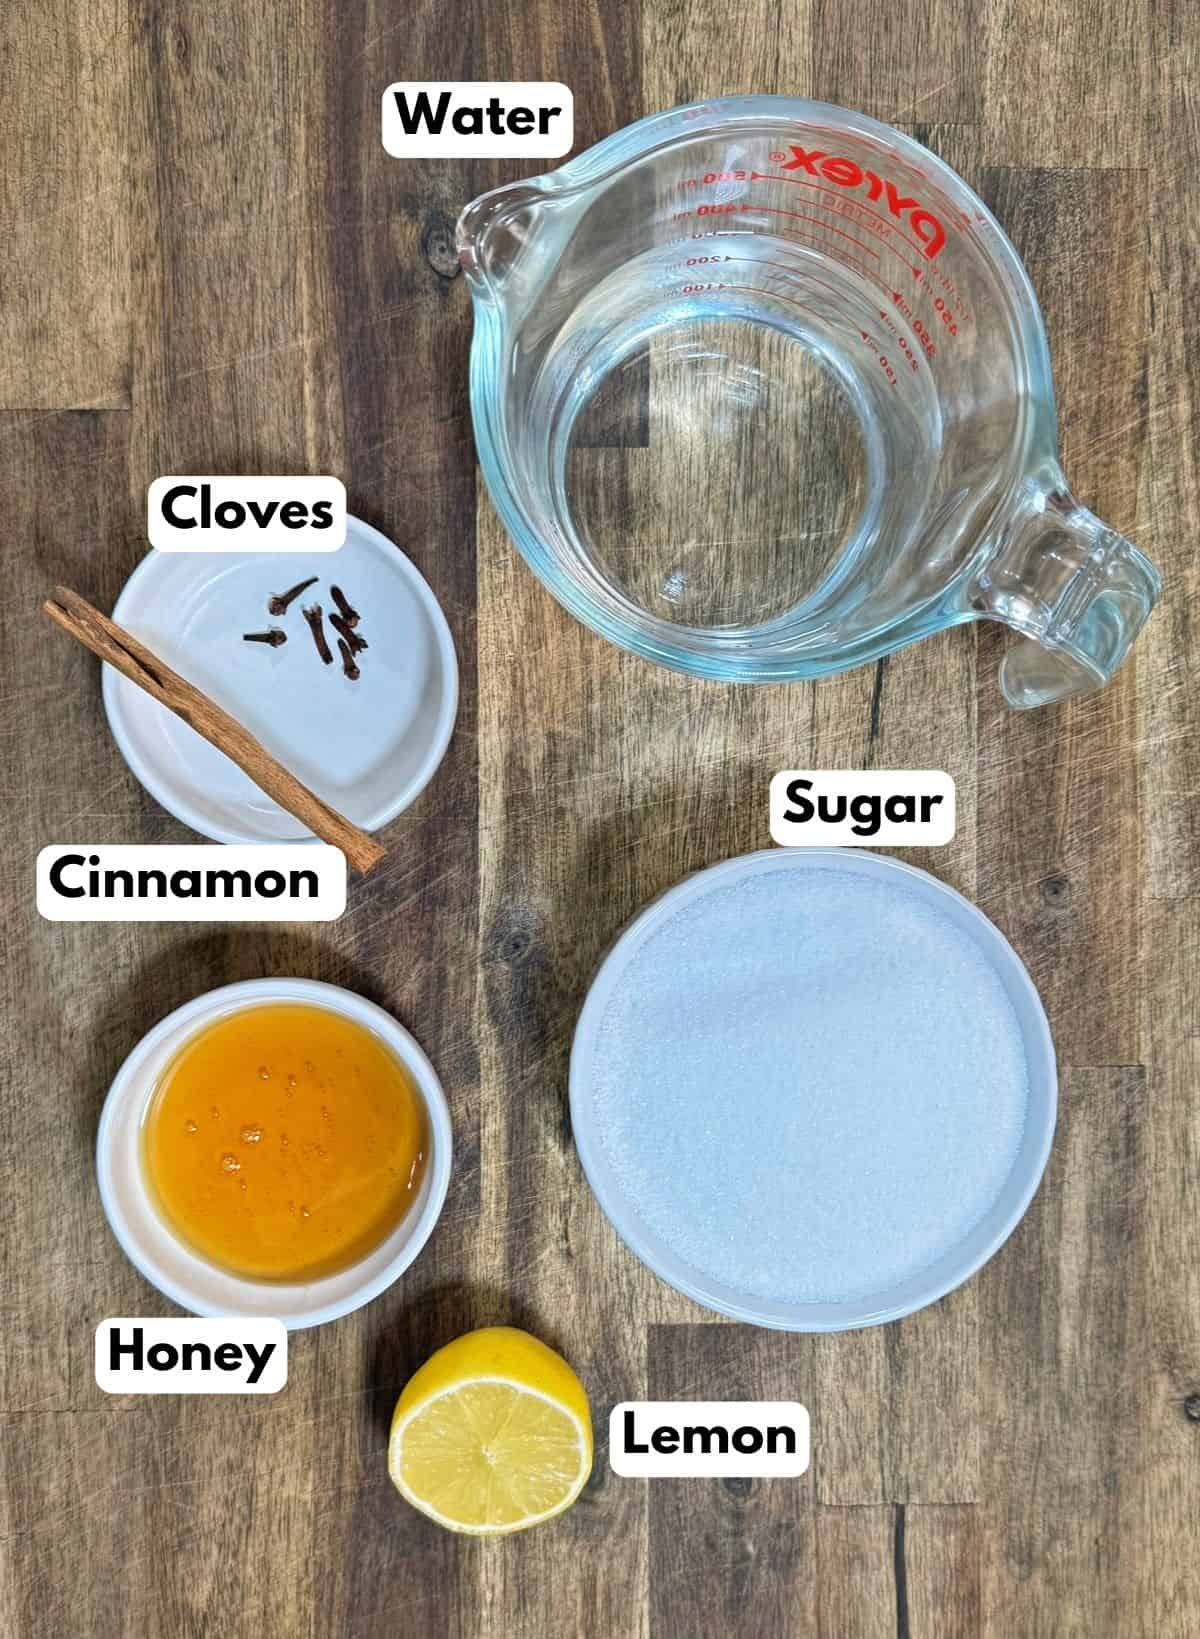
- Water and Sugar: Just like many of my other traditional desserts, this is the simple base for your sugar syrup. Once it boils, it thickens slightly and sets you up for that beautiful sticky finish.
- Cinnamon Stick and Whole Cloves: These bring warmth and that classic Greek dessert flavour. You’ll remove them after the syrup is done.
- Honey: A spoon of honey gives the syrup a richer, deeper flavour, and you can really taste the difference. Go for good quality if you can!
- Lemon: A squeeze of lemon juice adds brightness and a little zestiness to balance everything out. And if you want, you can also add the lemon peel for an extra layer of citrus flavour.
Nut mixture
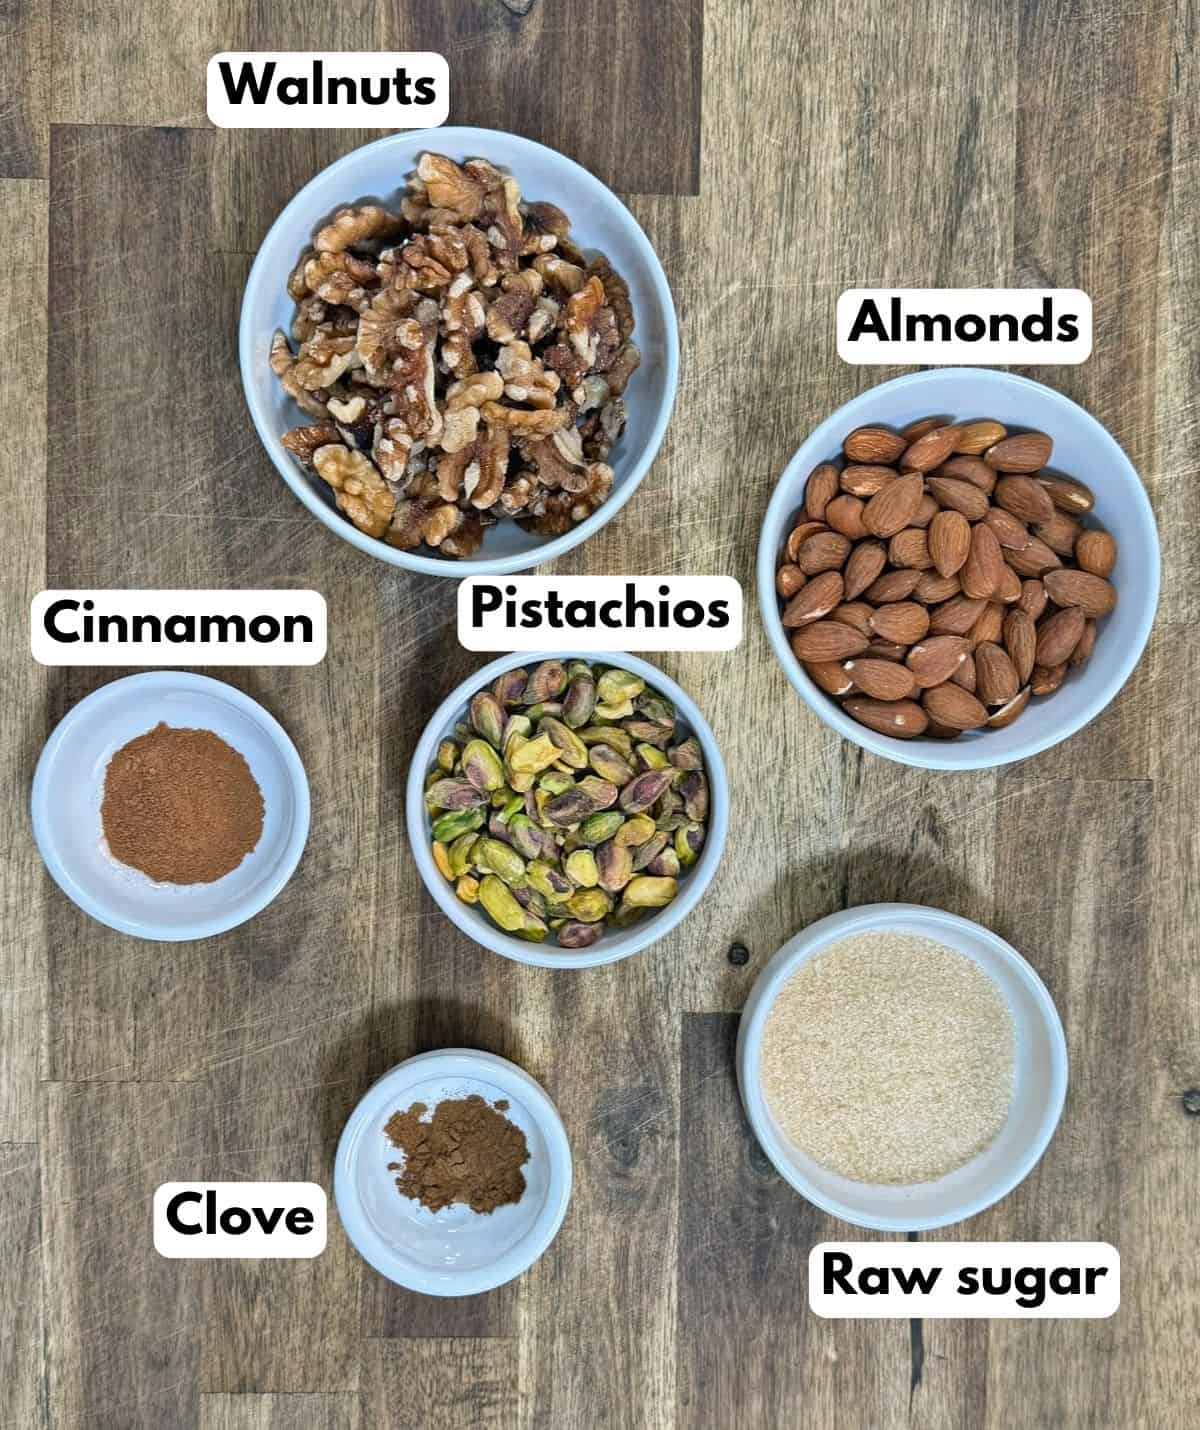
- Crushed Pistachios, Almonds, and Walnuts: This mix brings great flavour and a nice balance of textures. Don’t grind them down too much because you want small, crunchy pieces that give the filling texture and bite.
- Raw Sugar: Adds an extra touch of sweetness and gently caramelises into the nuts as they bake.
- Ground Clove and Cinnamon: These two spices bring warmth and depth, giving the filling that familiar baklava-style flavour we all love.
- Syrup: A few spoonfuls from the batch we just made help hold everything together, add a little extra flavour, and bind the mixture nicely.
For assembly
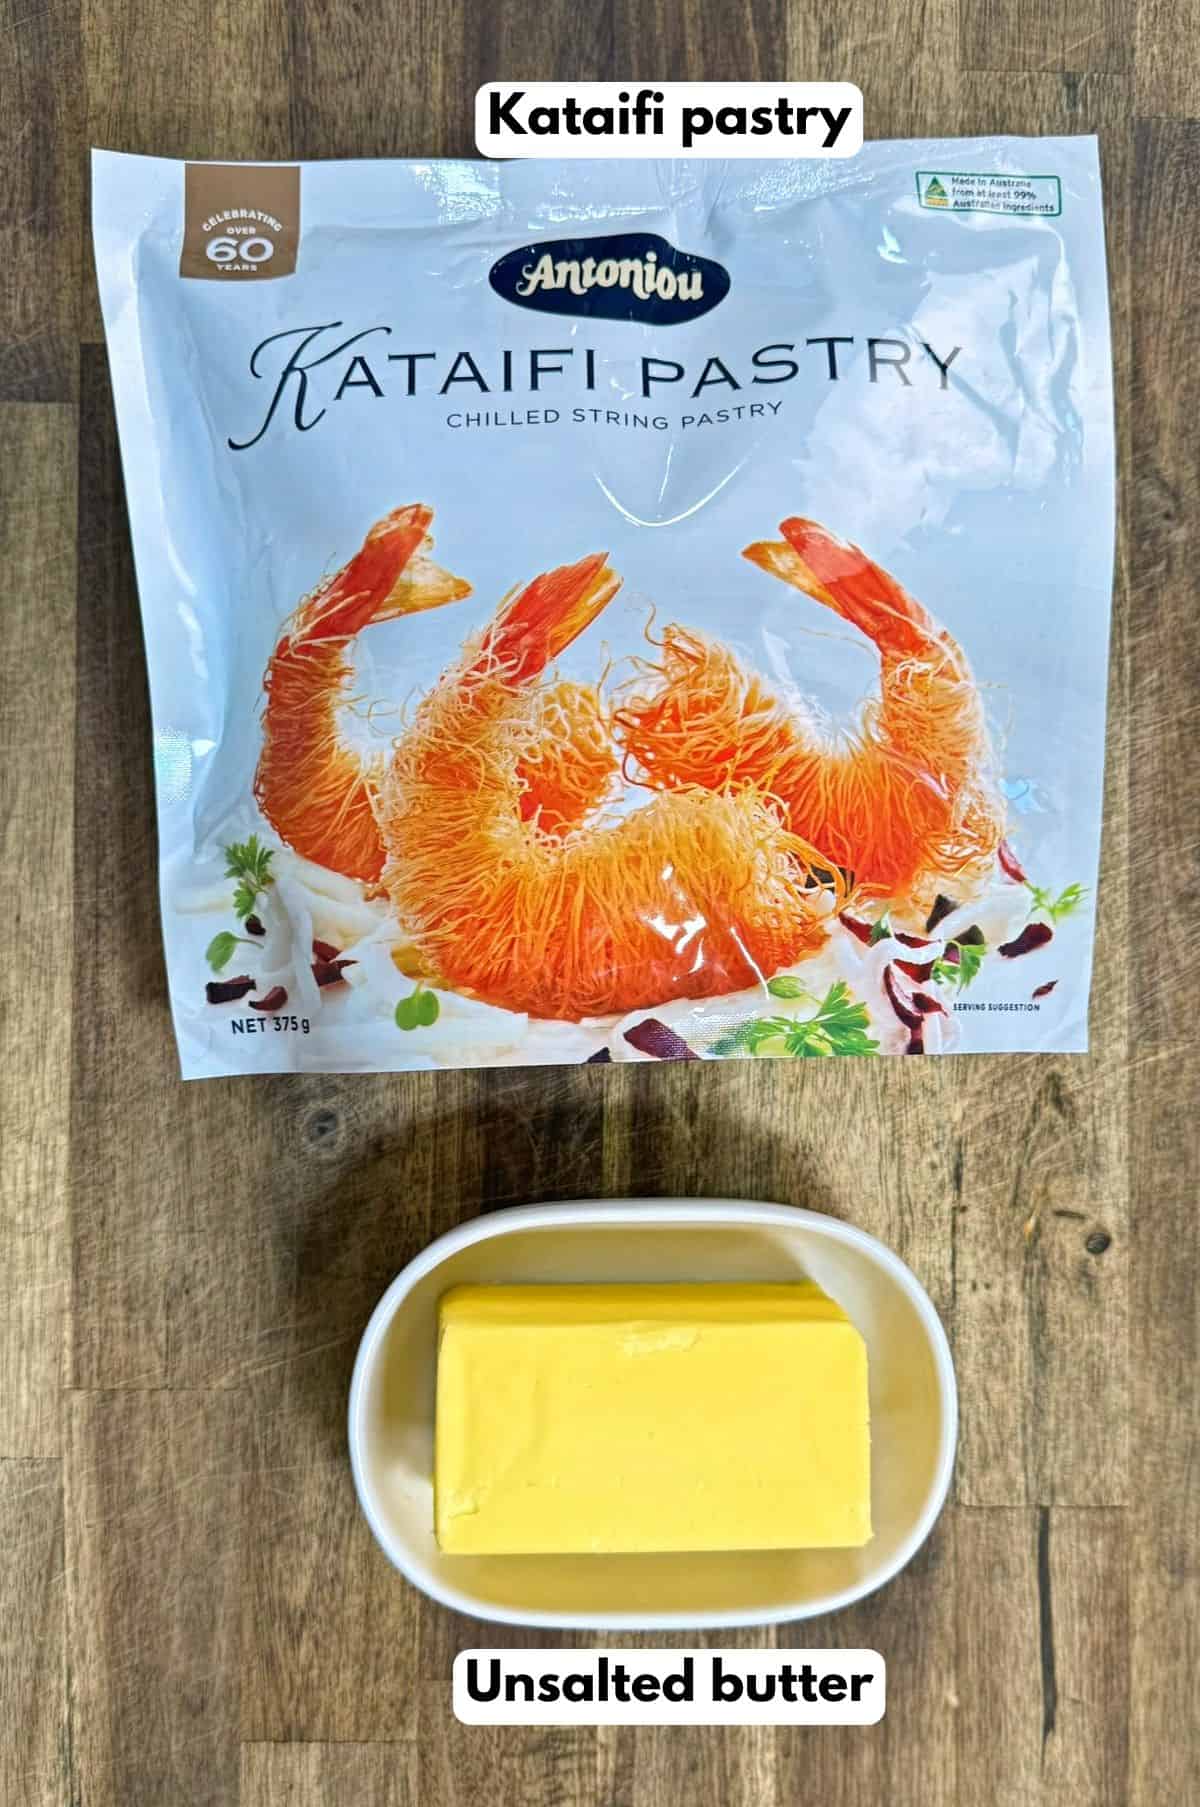
- Kataifi Pastry: This delicate shredded pastry is made up of fine, thin strands. Gently loosen and separate the strands with your fingers to get rid of any clumps. The kataifi pack I use is from the Antoniou brand.
- Unsalted Melted Butter: You’ll be brushing this all over the rolls and into the base of the baking dish. This step is key if you want that golden finish and proper crunchy kataifi texture.
Preparation
Before you start, it’s best to get everything set up so the process is smooth and stress-free. Here’s what I like to do before I begin:
- Start with a clean work surface: You’ll need space to untangle the kataifi pastry and assemble the rolls properly. It helps to keep things neat and makes the whole process easier.
- Use a damp kitchen tea towel: Cover your pastry with a damp tea towel while you're working. This keeps it from drying out and makes it easier to handle.
- Crush the nuts in a food processor: A few quick pulses will break them down to the right texture. If you don’t have a food processor, a pestle and mortar works well too. Just make sure not to grind them too fine.
- Have a large bowl ready: You’ll use this to mix the nut filling. It gives you space to combine everything evenly without making a mess.
- Get your pastry brush ready: This is essential for brushing the melted butter over the rolls and the base of the dish.
- Prep your baking dish: The one I use is 21cm x 31cm. You can use a smaller dish if needed, just pack the rolls in snugly so they hold their shape.
Step-by-step instructions
Follow these steps to bring these golden Greek kataifi rolls to life! This recipe makes about 18 rolls, and once you’ve done a few, you’ll get the hang of it quickly. Use the images as a guide, and if you need a bit of extra help, watch my video for a full step-by-step walkthrough.
Make the syrup
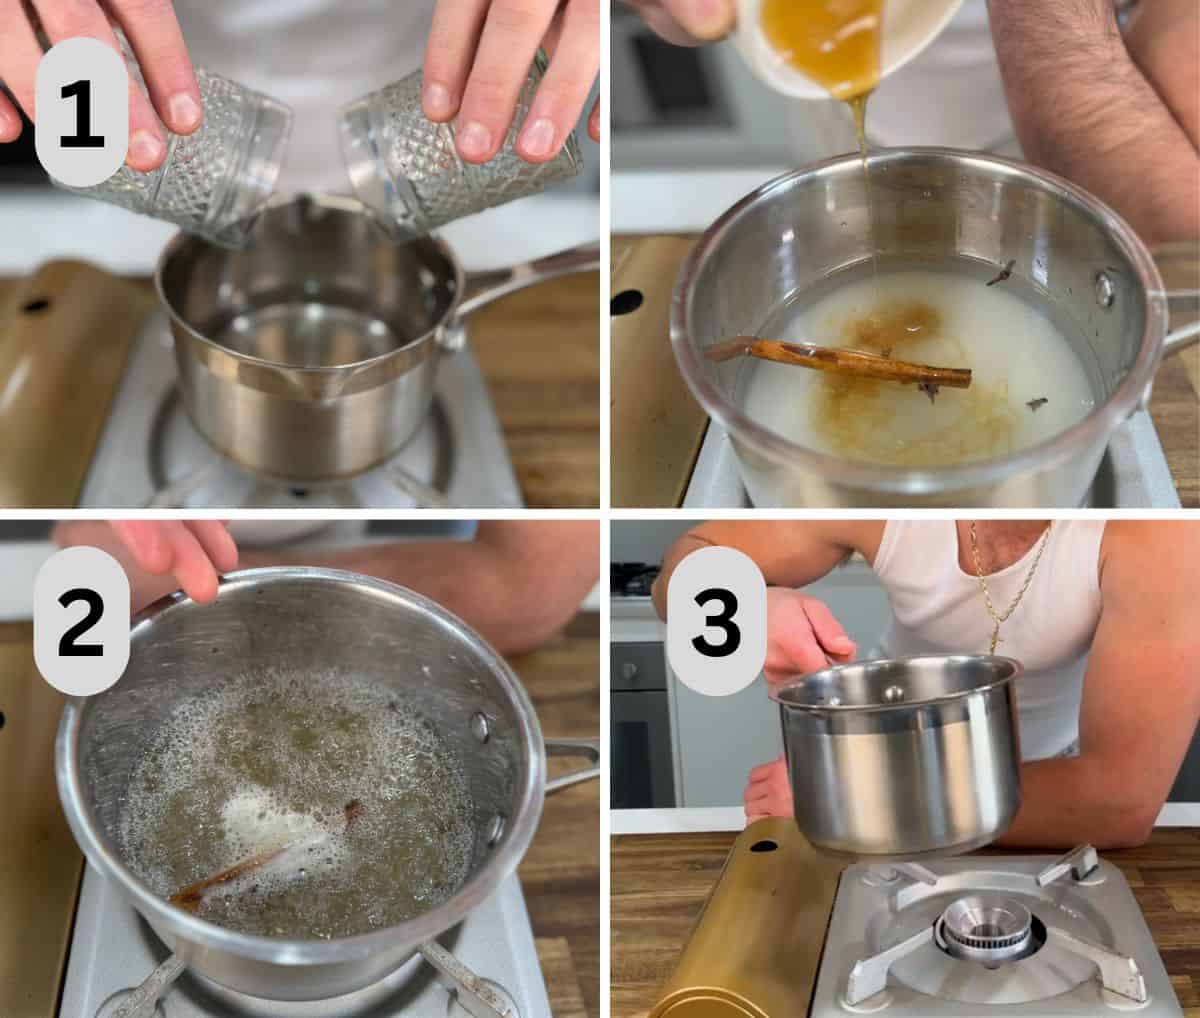
- Combine the ingredients: In a medium saucepan, add the sugar, water, lemon juice, cinnamon stick, whole cloves, and honey. This simple syrup brings the perfect amount of sweetness and warmth to your kataifi rolls.
- Bring to a boil: Set the saucepan over medium heat, stirring now and then. Once it reaches a gentle boil, let it bubble away for 1 minute so the sugar fully dissolves and the spices infuse properly.
- Cool completely: Turn off the heat and leave the syrup to cool down fully. This part’s important because pouring cold syrup over the hot pastry later is what gives the rolls their crispy outside and sticky centre.
Prepare the nut mixture
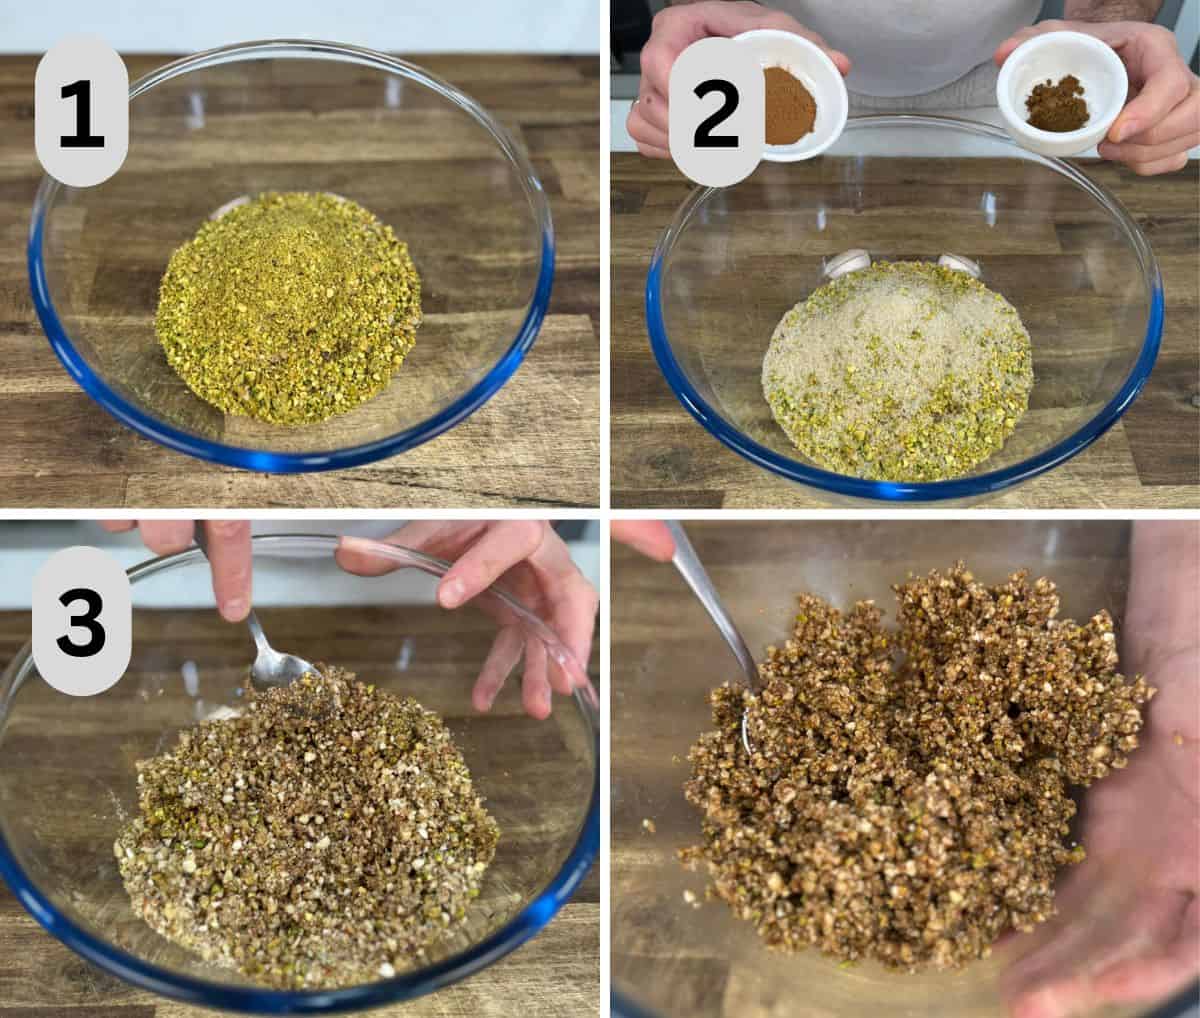
- Get your bowl ready: Grab a large bowl and add in the pre-crushed walnuts, almonds, and pistachio nuts. These give the rolls their classic nutty crunch and rich flavour.
- Add the extras: Sprinkle in the raw sugar, ground cinnamon, and ground clove, then add a bit of syrup from the pre-prepared sugar syrup. The spices bring warmth, and the syrup helps bring everything together.
- Mix everything well: Use a spoon to mix it all together until it’s evenly combined. The filling should all slightly stick together nicely without being too wet.
Assemble the kataifi rolls
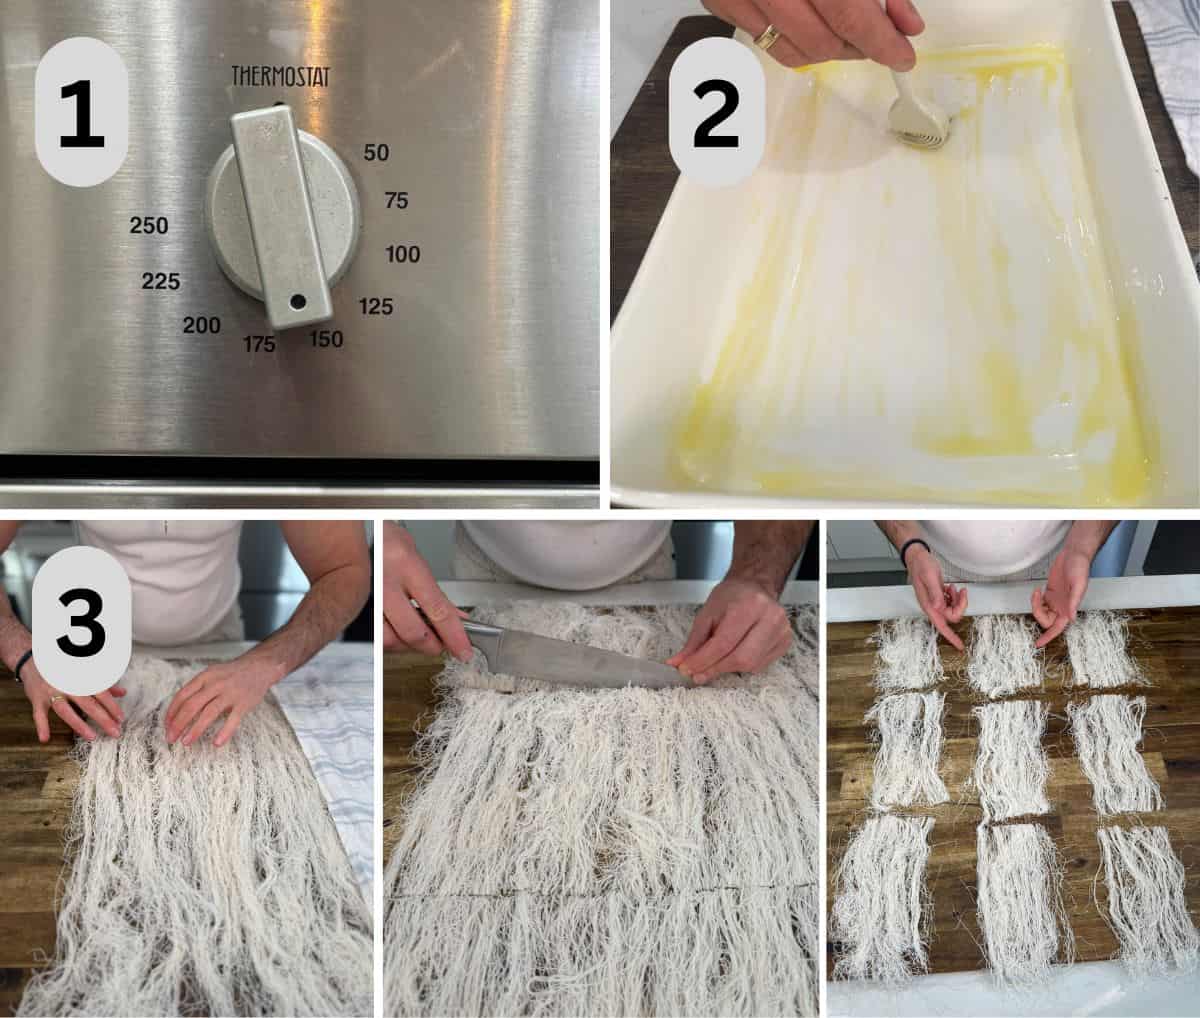
- Preheat the oven: Set your oven to 160°C (320°F) fan-forced so it’s ready by the time you’ve finished assembling the rolls. This lower temperature gives the kataifi pastry time to turn golden and crisp without burning or developing dark spots.
- Prepare the baking dish: Generously brush the bottom and sides of your baking dish with melted butter. I use a 21cm x 31cm tray, but you could even go a little smaller if you want the rolls packed in more snugly.
- Divide the kataifi pastry: Gently loosen and separate the strands of kataifi pastry with your fingers, getting rid of any clumps. Then divide the pastry into strips about 10cm wide and 20cm long. Use scissors or a knife to portion them as evenly as possible.
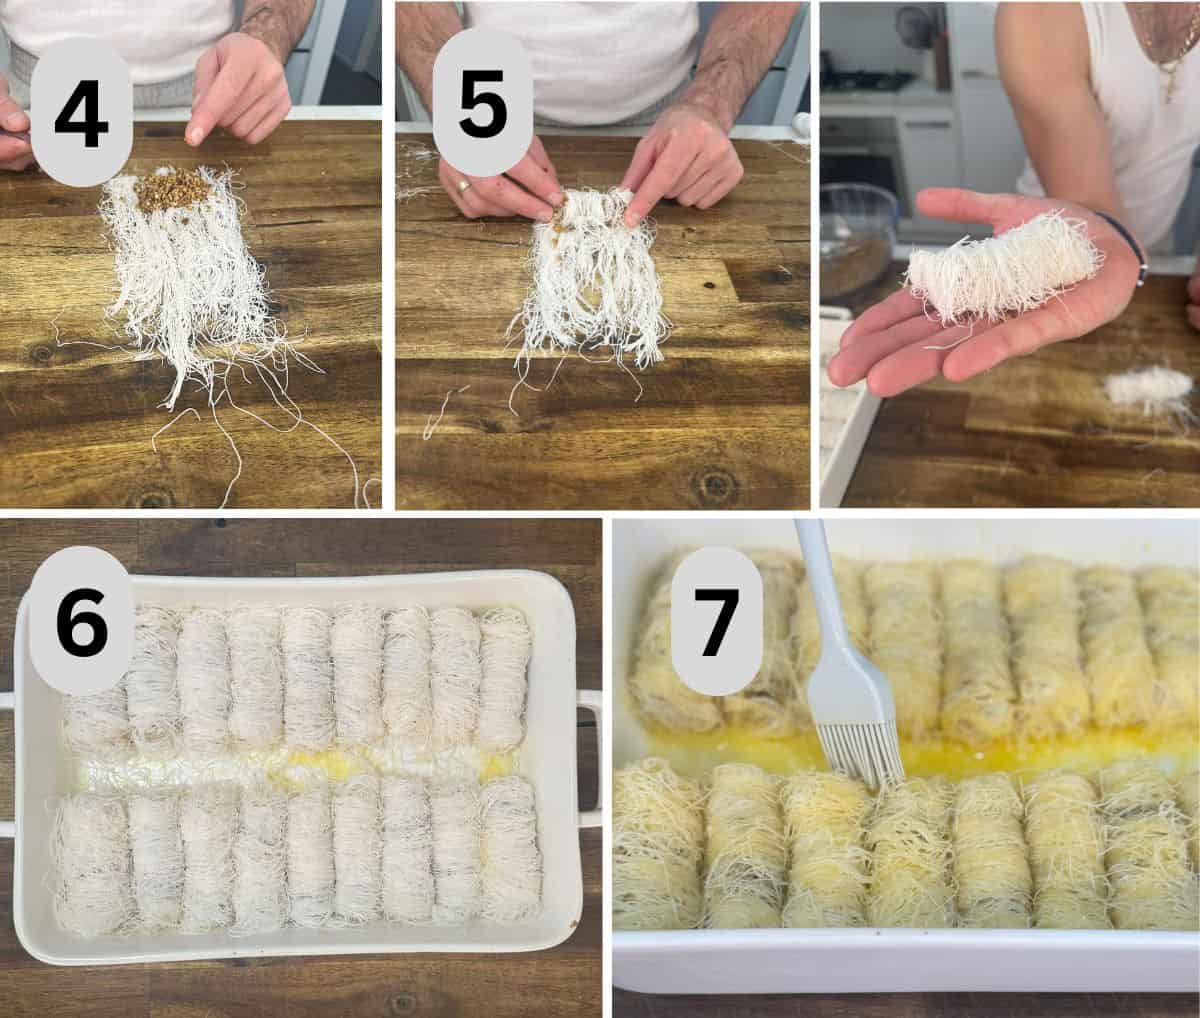
- Add the filling: Spoon a heaped tablespoon of the nut mixture onto the bottom edge of one of the kataifi strips. If you're making the same amount as me, that quantity should give you 18 rolls.
- Roll it up: Starting from the edge with the filling, roll the pastry up tightly like a cigar. Tuck the sides in slightly as you go to keep the filling secure and stop anything from falling out.
- Place in the baking dish: Arrange each kataifi roll snugly in the tray so they sit close together and hold their shape while baking.
- Butter the tops: Brush each roll generously with melted butter, making sure to coat both the tops and sides. Once all the rolls are covered, pour any remaining butter over the tray.
Bake and finish
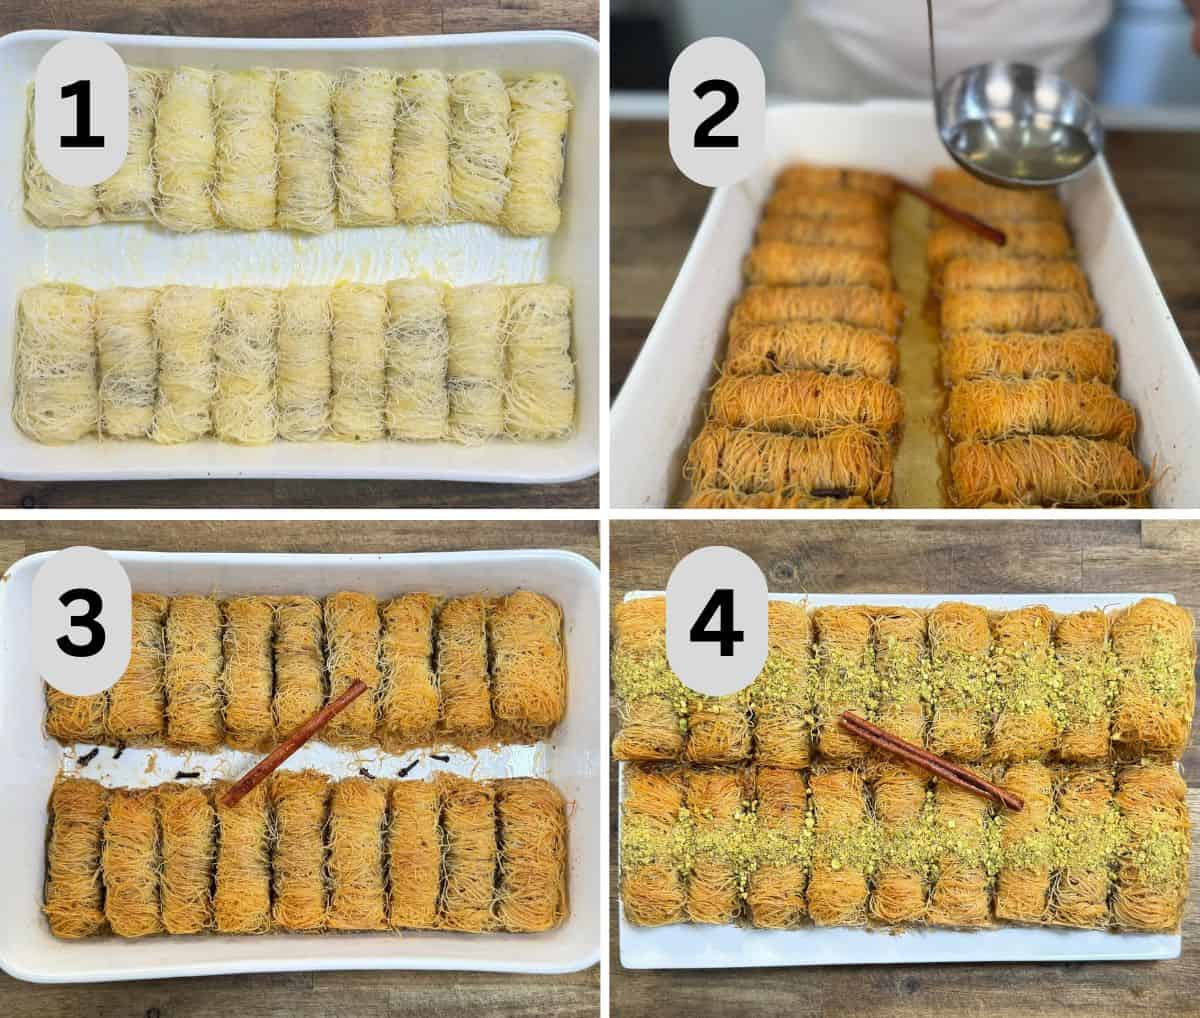
- Bake the kataifi rolls: Place the tray on the middle rack of your preheated oven and bake for 60 to 90 minutes, or until the rolls are golden brown and crisp on top. Keep an eye on them near the end so they don’t get too dark.
- Add the syrup: As soon as the tray comes out of the oven, slowly pour the cool syrup over the hot kataifi rolls. You should hear a soft sizzle as it soaks through.
- Let them rest: Leave the rolls to sit for a few hours, or until the syrup has fully absorbed. This lets the flavours soak right through while keeping the outside beautifully crisp.
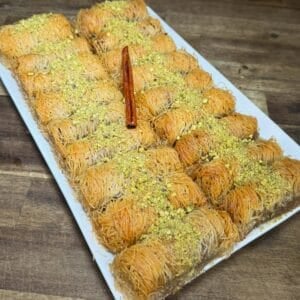
- Serve and enjoy: Transfer the rolls to a nice serving dish and sprinkle with extra pistachio nuts if you like.
Top tips
- Keep the pastry covered: While you're working, always cover the kataifi pastry with a damp kitchen towel, especially if you’re portioning it out like I am. It dries out quickly, and once it does, it becomes tricky to roll and won’t bake up the same.
- Roll them tight: Try to roll each one firmly so they hold their shape and bake evenly. If they’re a bit loose, they might unravel slightly in the oven. But don’t stress. There’s no right or wrong way for them to look. Once they’re golden and soaked in syrup, they’ll taste great either way.
- Cold syrup, hot rolls: Always pour the cooled syrup over the hot kataifi rolls. This is what keeps the outside crisp while the flavour soaks through the middle.
Serving suggestions
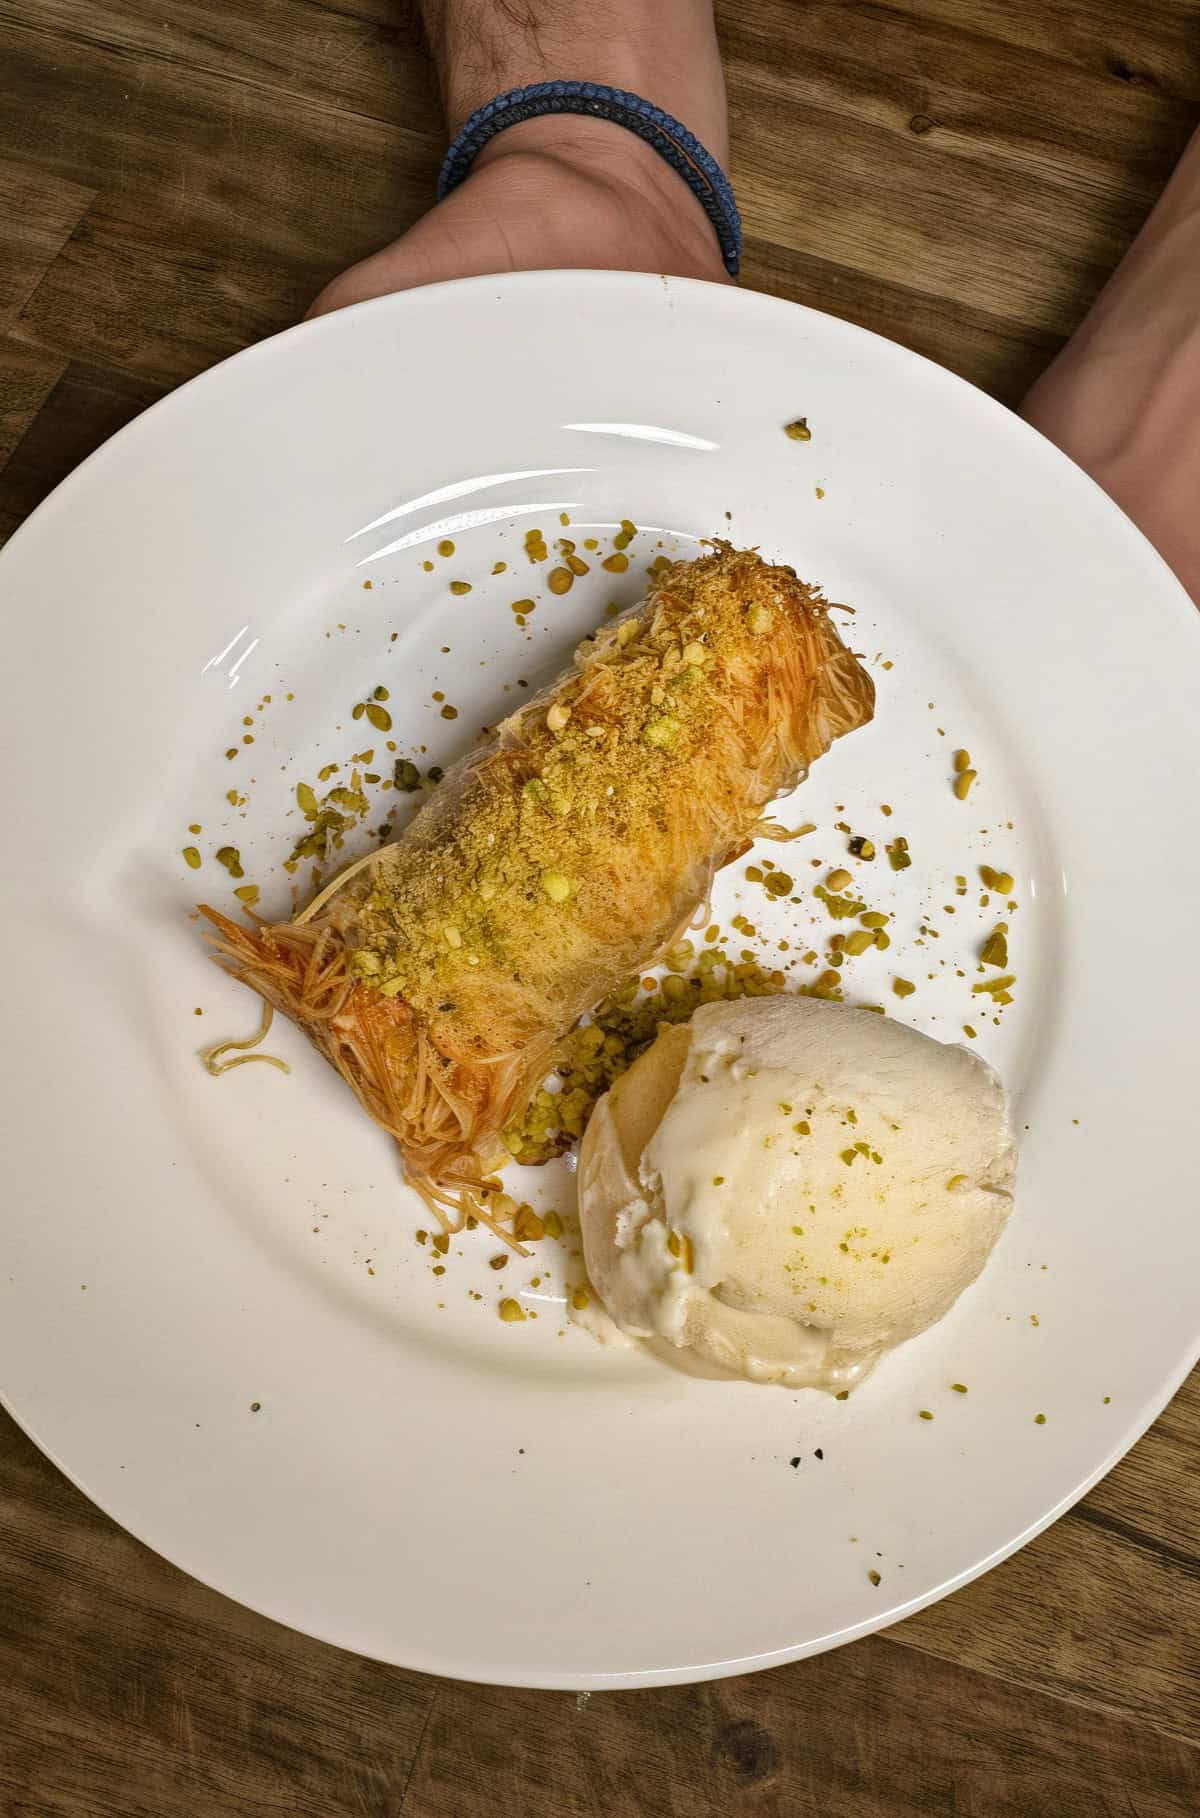
- Topped with Pistachios: Sprinkle extra crushed pistachio nuts on top just before serving. It adds a fresh crunch and a pop of colour that makes them look extra special.
- With Ice Cream: Serve with a scoop of vanilla or pistachio ice cream. The creamy texture balances the crispy pastry and syrup beautifully.
- Greek Coffee on the Side: Pair with a nice cup of Greek coffee. You can also serve it alongside other classic Greek treats like koulourakia or paximadia for a proper kafeneio style spread. Or add my moist orange cupcakes recipe to the table for something sweet, fluffy, and syrup-soaked that looks absolutely delicious.
- Finish to a Greek Feast: These make the perfect bite-size dessert to finish off the night nicely. Serve them after a big Greek dinner like my lamb kleftiko, pastitsio, moussaka, or chicken youvetsi.
Storage
- Store the kataifi rolls at room temperature for up to three days in a cool, dry spot away from direct sunlight or heat. I don’t recommend freezing these, as it can affect the texture of the pastry.
FAQs
You can, but you definitely don’t have to. I love the mix of pistachios, walnuts, and almonds because it gives a great balance of flavour and crunch. But if you’ve only got one or two types on hand, use what you like. It will still turn out great.
Kataifi pastry, also known as shredded filo, is made from the same dough as regular filo pastry. The dough is formed into thin, string-like strands that bake up light and crispy.
Mediterranean and Middle Eastern grocers usually have it, but some local supermarkets will also stock it in the fridge section near the fresh pasta.
📖 Recipe
Greek Kataifi Rolls Recipe (With Nuts and syrup)
Ingredients
Syrup ingredients
- 1.5 cups Water
- 1.5 cups Sugar
- 1 Cinnamon stick
- 6 Whole cloves
- 1 tablespoon Honey
- ½ Lemon (juiced)
Nut mixture
- 100 grams Walnuts crushed
- 100 grams Almonds crushed
- 50 grams Pistachios crushed
- 1 tablespoon Raw sugar
- 1 teaspoon Ground cinnamon
- ¼ teaspoon Ground cloves
- 2 tablespoon Syrup from prepared syrup
For Assembly
- 375 grams Kataifi pastry thin shredded filo strands
- 250 grams Unsalted butter melted
Instructions
Make the syrup
- In a saucepan, combine the sugar, water, lemon juice, cinnamon stick, cloves, and honey.
- Place over medium heat, stirring occasionally, and bring the mixture to a boil.
- Boil for 1 minute, then turn off the heat and set aside to cool completely.
Prepare the nut mixture
- In a large bowl, combine the crushed walnuts, almonds, and pistachios.
- Add the raw sugar, ground cinnamon, ground cloves, and syrup.
- Mix well until evenly combined, then set aside.
Assemble the kataifi rolls
- Preheat your oven to 160°C (320°F) fan-forced.
- Brush the bottom and sides of your baking dish generously with melted butter.
- Gently loosen and separate the kataifi pastry with your fingers, laying it out on your bench. Untangle the strands and remove any clumps. Cover with a damp kitchen towel while you work to prevent it from drying out.
- Divide the pastry into strips roughly 10 cm wide and 20 cm long. Use scissors or a knife to portion them as evenly as you can.
- Evenly divide the nut mixture along the bottom edge of each kataifi strip (it should be roughly 1 heaped tablespoon per roll).
- Starting from the edge with the nuts, roll tightly like a cigar, tucking in the sides as you go to keep the filling secure.
- Arrange the rolls snugly in the baking dish.
- Brush each roll generously with melted butter, making sure to coat the tops and sides. Pour any remaining butter over the entire tray.
Baking and finishing
- Bake in the preheated oven until golden brown and crisp, about 60 to 90 minutes.
- Remove the tray from the oven and immediately pour the cooled syrup evenly over the hot kataifi rolls.
- Let them rest for a few hours to fully absorb the syrup.
- Serve and enjoy!
Video
Notes
- Portions: This recipe makes 18 kataifi rolls if you follow my measurements.
- Don’t Stress the Shape: They don’t need to look perfect. Once they’re golden, crisp, and soaked in syrup, they’ll taste just as good.


Leave a Reply